Wednesday 29 February 2012

Intro to ASP.NET MVC 4

This tutorial will teach you the basics of building an ASP.NET MVC Web application using Microsoft Visual Web Developer 2010 Express Service Pack 1, which is a free version of Microsoft Visual Studio. Before you start, make sure you've installed the prerequisites listed below. You can install all of them by clicking the following links:

·         Visual Studio Web Developer Express SP1 prerequisites

·         WPI installer for ASP.NET MVC 4 Beta

·         SQL Server Compact 4.0 (runtime + tools support)

If you're using Visual Studio 2010 instead of Visual Web Developer 2010, install the WPI installer for ASP.NET MVC 4 Beta and  the following link: Visual Studio 2010 prerequisites
A Visual Web Developer project with C# source code is available to accompany this topic. Download the C# version.

What You'll Build

You'll implement a simple movie-listing application that supports creating, editing, searching and listing movies from a database. Below are two screenshots of the application you’ll build. It includes a page that displays a list of movies from a database:

The application also lets you add, edit, and delete movies, as well as see details about individual ones. All data-entry scenarios include validation to ensure that the data stored in the database is correct.

Skills You'll Learn

Here's what you'll learn:
  • How to create a new ASP.NET MVC project.
  • How to create ASP.NET MVC controllers and views.
  • How to create a new database using the Entity Framework Code First paradigm.
  • How to retrieve and display data.
  • How to edit data and enable data validation.

Getting Started

Start by running Visual Web Developer 2010 Express ("Visual Web Developer" for short) and select New Project from the Start page.
Visual Web Developer is an IDE, or integrated development environment. Just like you use Microsoft Word to write documents, you'll use an IDE to create applications. In Visual Web Developer there's a toolbar along the top showing various options available to you. There's also a menu that provides another way to perform tasks in the IDE. (For example, instead of selecting New Project from the Start page, you can use the menu and select File > New Project.)

Creating Your First Application

You can create applications using either Visual Basic or Visual C# as the programming language. Select Visual C# on the left and then select ASP.NET MVC 4 Web Application. Name your project "MvcMovie" and then click OK.

In the New ASP.NET MVC 4 Project dialog box, select Internet Application. Check Use HTML5 markup and leave Razor as the default view engine.

Click OK. Visual Web Developer used a default template for the ASP.NET MVC project you just created, so you have a working application right now without doing anything! This is a simple "Hello World!" project, and it's a good place to start your application.

From the Debug menu, select Start Debugging.

Notice that the keyboard shortcut to start debugging is F5.
F5 causes Visual Web Developer to start a development web server and run your web application. Visual Web Developer then launches a browser and opens the application's home page. Notice that the address bar of the browser says localhost and not something like example.com. That's because localhost always points to your own local computer, which in this case is running the application you just built. When Visual Web Developer runs a web project, a random port is used for the web server. In the image below, the port number is 1234. When you run the application, you'll probably see a different port number.

Right out of the box this default template gives you  Home, Contact and About pages. It also provides support to register and log in, and links to Facebook and Twitter. The next step is to change how this application works and learn a little bit about ASP.NET MVC. Close your browser and let's change some code.

Tuesday 21 February 2012

New features of ASP.Net MVC 4 presentation

New features of ASP.Net MVC 4 presentation

New Bundling and Minification Support - ASP.NET 4.5 Series

The next release of .NET and Visual Studio include a ton of great new features and capabilities.  With ASP.NET 4.5 you'll see a bunch of really nice improvements with both Web Forms and MVC - as well as in the core ASP.NET base foundation that both are built upon.

This post covers some of the work done to add built-in support for bundling and minification into ASP.NET - which makes it easy to improve the performance of applications.  This feature can be used by all ASP.NET applications, including both ASP.NET MVC and ASP.NET Web Forms solutions.

Basics of Bundling and Minification

As more and more people use mobile devices to surf the web, it is becoming increasingly important that the websites and apps we build perform well with them. We’ve all tried loading sites on our smartphones – only to eventually give up in frustration as it loads slowly over a slow cellular network.  If your site/app loads slowly like that, you are likely losing potential customers because of bad performance.  Even with powerful desktop machines, the load time of your site and perceived performance can make an enormous customer perception.
Most websites today are made up of multiple JavaScript and CSS files to separate the concerns and keep the code base tight. While this is a good practice from a coding point of view, it often has some unfortunate consequences for the overall performance of the website.  Multiple JavaScript and CSS files require multiple HTTP requests from a browser – which in turn can slow down the performance load time.

Simple Example
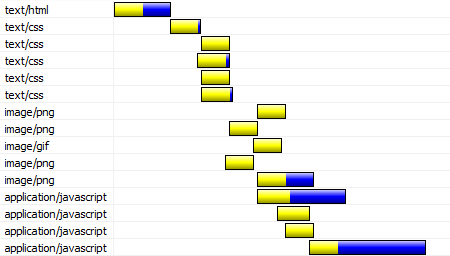
Below I’ve opened a local website in IE9 and recorded the network traffic using IE’s built-in F12 developer tools. As shown below, the website consists of 5 CSS and 4 JavaScript files which the browser has to download. Each file is currently requested separately by the browser and returned by the server, and the process can take a significant amount of time proportional to the number of files in question.
image

Bundling
ASP.NET is adding a feature that makes it easy to “bundle” or “combine” multiple CSS and JavaScript files into fewer HTTP requests. This causes the browser to request a lot fewer files and in turn reduces the time it takes to fetch them.   Below is an updated version of the above sample that takes advantage of this new bundling functionality (making only one request for the JavaScript and one request for the CSS):
image
The browser now has to send fewer requests to the server. The content of the individual files have been bundled/combined into the same response, but the content of the files remains the same - so the overall file size is exactly the same as before the bundling.   But notice how even on a local dev machine (where the network latency between the browser and server is minimal), the act of bundling the CSS and JavaScript files together still manages to reduce the overall page load time by almost 20%.  Over a slow network the performance improvement would be even better.

Minification
The next release of ASP.NET is also adding a new feature that makes it easy to reduce or “minify” the download size of the content as well.  This is a process that removes whitespace, comments and other unneeded characters from both CSS and JavaScript. The result is smaller files, which will download and load in a browser faster.  The graph below shows the performance gain we are seeing when both bundling and minification are used together:
image
Even on my local dev box (where the network latency is minimal), we now have a 40% performance improvement from where we originally started.  On slow networks (and especially with international customers), the gains would be even more significant.

Using Bundling and Minification inside ASP.NET

The upcoming release of ASP.NET makes it really easy to take advantage of bundling and minification within projects and see performance gains like in the scenario above. The way it does this allows you to avoid having to run custom tools as part of your build process –  instead ASP.NET has added runtime support to perform the bundling/minification for you dynamically (caching the results to make sure perf is great).  This enables a really clean development experience and makes it super easy to start to take advantage of these new features.
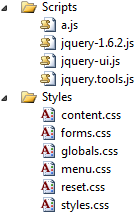
Let’s assume that we have a simple project that has 4 JavaScript files and 6 CSS files:
image

Bundling and Minifying the .css files
Let’s say you wanted to reference all of the stylesheets in the “Styles” folder above on a page.  Today you’d have to add multiple CSS references to get all of them – which would translate into 6 separate HTTP requests:
image
The new bundling/minification feature now allows you to instead bundle and minify all of the .css files in the Styles folder – simply by sending a URL request to the folder (in this case “styles”) with an appended “/css” path after it.  For example:
   image
This will cause ASP.NET to scan the directory, bundle and minify the .css files within it, and send back a single HTTP response with all of the CSS content to the browser. 
You don’t need to run any tools or pre-processor to get this behavior.  This enables you to cleanly separate your CSS into separate logical .css files and maintain a very clean development experience – while not taking a performance hit at runtime for doing so.  The Visual Studio designer will also honor the new bundling/minification logic as well – so you’ll still get a WYSWIYG designer experience inside VS as well.

Bundling and Minifying the JavaScript files
Like the CSS approach above, if we wanted to bundle and minify all of our JavaScript into a single response we could send a URL request to the folder (in this case “scripts”) with an appended “/js” path after it:
  image
This will cause ASP.NET to scan the directory, bundle and minify the .js files within it, and send back a single HTTP response with all of the JavaScript content to the browser.  Again – no custom tools or builds steps were required in order to get this behavior.  And it works with all browsers.

Ordering of Files within a Bundle
By default, when files are bundled by ASP.NET they are sorted alphabetically first, just like they are shown in Solution Explorer. Then they are automatically shifted around so that known libraries and their custom extensions such as jQuery, MooTools and Dojo are loaded before anything else. So the default order for the merged bundling of the Scripts folder as shown above will be:
  1. Jquery-1.6.2.js
  2. Jquery-ui.js
  3. Jquery.tools.js
  4. a.js
By default, CSS files are also sorted alphabetically and then shifted around so that reset.css and normalize.css (if they are there) will go before any other file. So the default sorting of the bundling of the Styles folder as shown above will be:
  1. reset.css
  2. content.css
  3. forms.css
  4. globals.css
  5. menu.css
  6. styles.css
The sorting is fully customizable, though, and can easily be changed to accommodate most use cases and any common naming pattern you prefer.  The goal with the out of the box experience, though, is to have smart defaults that you can just use and be successful with.

Any number of directories/sub-directories supported
In the example above we just had a single “Scripts” and “Styles” folder for our application.  This works for some application types (e.g. single page applications).  Often, though, you’ll want to have multiple CSS/JS bundles within your application – for example: a “common” bundle that has core JS and CSS files that all pages use, and then page specific or section specific files that are not used globally.
You can use the bundling/minification support across any number of directories or sub-directories in your project – this makes it easy to structure your code so as to maximize the bunding/minification benefits.  Each directory by default can be accessed as a separate URL addressable bundle. 

Bundling/Minification Extensibility

ASP.NET’s bundling and minification support is built with extensibility in mind and every part of the process can be extended or replaced.

Custom Rules
In addition to enabling the out of the box - directory-based - bundling approach, ASP.NET also supports the ability to register custom bundles using a new programmatic API we are exposing. 
The below code demonstrates how you can register a “customscript” bundle using code within an application’s Global.asax class.  The API allows you to add/remove/filter files that go into the bundle on a very granular level:
    image
The above custom bundle can then be referenced anywhere within the application using the below <script> reference:
    image

Custom Processing
You can also override the default CSS and JavaScript bundles to support your own custom processing of the bundled files (for example: custom minification rules, support for Saas, LESS or Coffeescript syntax, etc).
In the example below we are indicating that we want to replace the built-in minification transforms with a custom MyJsTransform and MyCssTransform class. They both subclass the CSS and JavaScript minifier respectively and can add extra functionality:
    image
The end result of this extensibility is that you can plug-into the bundling/minification logic at a deep level and do some pretty cool things with it.

2 Minute Video of Bundling and Minification in Action

Mads Kristensen has a great 90 second video that shows off using the new Bundling and Minification feature.  You can watch the 90 second video here.

Summary

The new bundling and minification support within the next release of ASP.NET will make it easier to build fast web applications.  It is really easy to use, and doesn’t require major changes to your existing dev workflow.  It is also supports a rich extensibility API that enables you to customize it however you want.
You can easily take advantage of this new support within ASP.NET MVC, ASP.NET Web Forms and ASP.NET Web Pages based applications.

This blog post has been originally written by ScottGu on Monday, November 28, 2011 1:58 AM I have published it as I think my followers will benefit from it.

ASP.NET MVC 4 Released in Beta

Microsoft has released the beta of ASP.NET MVC 4, with new features including the ability to create Web APIs.

The beta works with VS 2010 and .NET 4.0, and will also be built into VS11/ .NET 4.5 beta that’s due shortly. It doesn’t work with the VS11 developer preview, so don’t try installing it alongside that. However, it can be use alongside prior releases of ASP.NET MVC.

aspnet

The new features start with support for bundling and minification, which in English means you can create web apps that load faster, particularly on mobile devices.

The bundling refers to ASP.NET’s new ability to let you “bundle” or combine multiple CSS and JavaScript files into fewer HTTP requests. This causes the browser to request a lot fewer files and in turn reduces the time it takes to fetch them.

Minification lets you reduce or “minify” the download size of the content by removing whitespace, comments and other unneeded characters from both CSS and JavaScript.

There are other improvements aimed at making it easier to write mobile web apps and mobile web sites that are optimized for viewing on smartphones and tablets. These additions include jQuery Mobile, and also the ability to customize which view templates are used depending upon what type of device is accessing the app.
 
Still on the web front, the new beta lets you create HTTP services and APIs that can be called from code running on clients ranging from browsers using JavaScript, to native apps on any mobile/client platform). Scott Guthrie says the new Web API support also provides an ideal platform for building RESTful services.
The beta now comes with V2 of Microsoft’s Razor View engine which has been improved to give you better control over your view templates, including better support for resolving URL references and selectively rendering HTML attributes. Support for Async and WebSockets has also been added. Async support will come into its own with Visual Studio, as there are async language enhancements to C# and VB.
The beta also comes with WebSocket support built in so you can write apps that have tighter communication between the client browser and the server.

Friday 17 February 2012

New MVC4 Project Templates

Task 1 – Exploring the Internet Application Template

  1. Open Visual Studio 11.
  2. Select the File | New | Project menu command. In the New Project dialog, select the Visual C#|Web template on the left pane tree, and choose the ASP.NET MVC 4 Web Application. Name the project PhotoGallery, select a location (or leave the default) and click OK.
    Note:
     You will later customize the PhotoGallery MVC 4 solution you are now creating.


    Figure 1 Creating a new project
  3. In the New ASP.NET MVC 4 Project dialog, select the Internet Application project template and click OK. Make sure you have selected Razor as the view engine.
    Figure 2 Creating a new MVC4 Internet Application
    Note:
    Razor syntax has been introduced in ASP.NET MVC 3. Its goal is to minimize the number of characters and keystrokes required in a file, enabling a fast and fluid coding workflow. Razor leverages existing C#/VB (or other) language skills and delivers a template markup syntax that enables an awesome HTML construction workflow.
  4. Press F5 to run the solution and see the renewed templates. You can check out the following features:
    • Modern-style templates The templates have been renewed, providing more modern-looking styles.

      Figure 3 MVC4 restyled templates


      Figure 4 New Contact page
    • Richer UI with JavaScript Another enhancement to default project templates is the use of JavaScript to provide a more interactive JavaScript. The Login and Register links used in the template exemplify how to use the jQuery UI Dialog to display a fancy login screen.

      Figure 5 Log On dialog


      Figure 6 Registration dialog
    • Adaptive Rendering Check out resizing the browser window and notice how the page layout dynamically adapts to the new window size. These templates use the adaptive rendering technique to render properly in both desktop and mobile platforms without any customization.

      Figure 7 MVC 4 project template in different browser sizes
  5. Close the browser to stop the debugger and return to Visual Studio.
  6. Now you are able to explore the solution and check out some of the new features introduced by ASP.NET MVC 4 in the project template.
    Figure 8 The MVC4 Internet Application Project Template

    • HTML 5 Markup Browse template views to find out the new theme markup.

      Figure 9 New template, using Razor and HTML5 markup (About.cshtml).
    • Updated JavaScript libraries The MVC4 default template now includes KnockoutJS, a JavaScript MVVM framework that lets you create rich and highly responsive web applications using JavaScript and HTML. Like in MVC3, jQuery and jQuery UI libraries are also included in ASP.NET MVC 4.
      Note:
      You can get more information about KnockOutJS library in this link: http://learn.knockoutjs.com/.
      Additionally, you can learn about jQuery and jQuery UI in http://docs.jquery.com/.
    • ASP.NET Universal providers included in the solution ASP.NET Universal Providers extend Session, Membership, Roles and Profile support to SQL Compact Edition and SQL Azure. By only configuring the right connection string, your application will be able to work with SQL Server (plus Express), SQL Server Compact or SQL Azure.
      Note:
      ASP.NET Universal Providers Library is also available for MVC3 projects in the NuGet public feed.
      You can learn more about SQL Azure in this link: http://msdn.microsoft.com/en-us/wazplatformtrainingcourse_sqlazure_unit.


      Figure 10 ASP.NET Universal Providers reference is now included

Tuesday 14 February 2012

How to Create a SQL Azure Database

To create a new database, you must connect to the master database. The following steps show you how to create a database using the Management Portal for SQL Azure.
  1. At the top of the navigation pane, expand Subscriptions, expand the subscription, expand the SQL Azure server you created, click master, and then click Manage.
    This opens the Management Portal for SQL Azure logon screen.
  2. Enter the user name and the password that you specified when you created the SQL Azure server, and then click Log on. This opens the Management Portal for SQL Azure in a different browser tab or a new browser window.
    Note: If an error occurs, it displays a message saying "There was an error connecting to the server" beneath the Password textbox. You can click on the message to see the error details. A common error is the firewall rule not created for the client computer.
  3. In the Management Portal for SQL Azure, click New Query.
  4. In the query window, copy and paste the following Transact-SQL script using your own name for the database in place of database_name:
    CREATE DATABASE database_name;
  5. Click Execute. Make sure the result pane showing Command(s) completed successfully.
  6. Click Log off on the upper right corner, and then click Log off again to confirm logging off without saving the query.
  7. Switch back to the Windows Azure Management Portal.
  8. From the View ribbon, click Refresh. The new database is listed in the navigation pane.
SQL Azure Database provides two database editions:
  • Web Edition - Grows up to a size of 5 GB
  • Business Edition - Grows up to a size of 50 GB.
The MAXSIZE is specified when the database is first created and can later be changed using ALTER DATABASE. MAXSIZE provides the ability to limit the size of the database.
You can also use SQL Server Management Studio 2008 R2 (SSMS) to create a SQL Azure database. For a list of supported tools and utilities, see Tools and Utilities Support (SQL Azure Database). For more information on creating SQL Azure database, see How to Create a SQL Azure database.
For each database created on SQL Azure, there are actually three replicas of that database. This is done to ensure high availability. Failover is transparent and part of the service. The Service Level Agreement provides 99.9% uptime for SQL Azure.

Connect to the SQL Azure Database

This section shows how to connect to SQL Azure database using different .NET Framework data providers.
If you choose to use Visual Studio 2010 and your configuration doesn't include a Windows Azure web application as a front-end, there are no additional tools or SDKs needed to be installed on the development computer. You can just start developing your application.
You can use all of the same designer tools in Visual Studio to work with SQL Azure as you can to work with SQL Server. The Server Explorer allows you to view (but not edit) database objects. The Visual Studio Entity Data Model Designer is fully functional and you can use it to create models against SQL Azure for working with Entity Framework.

Using .NET Framework Data Provider for SQL Server

The System.Data.SqlClient namespace is the.NET Framework Data Provider for SQL Server.
The standard connection string looks like this:
Server=tcp:.database.windows.net;
Database=;
User ID=@;
Password=;
Trusted_Connection=False;
Encrypt=True;
You can use the SQLConnectionStringBuilder class to build a connection string as shown in the following code sample:
SqlConnectionStringBuilder csBuilder;
csBuilder = new SqlConnectionStringBuilder();
csBuilder.DataSource = xxxxxxxxxx.database.windows.net;
csBuilder.InitialCatalog = testDB;
csBuilder.Encrypt = true;
csBuilder.TrustServerCertificate = false;
csBuilder.UserID = MyAdmin;
csBuilder.Password = pass@word1;
If the elements of a connection string are known ahead of time, they can be stored in a configuration file and retrieved at run time to construct a connection string. Here is a sample connection string in configuration file:
<connectionStrings>
  <add name="ConnectionString" 
       connectionString ="Server=tcp:xxxxxxxxxx.database.windows.net;Database=testDB;User ID=MyAdmin@xxxxxxxxxx;Password=pass@word1;Trusted_Connection=False;Encrypt=True;" />
</connectionStrings>
To retrieve the connection string in a configuration file, you use the ConfigurationManager class:
SqlConnectionStringBuilder csBuilder;
csBuilder = new SqlConnectionStringBuilder(ConfigurationManager.ConnectionStrings["ConnectionString"].ConnectionString);
After you have built your connection string, you can use the SQLConnection class to connect the SQL Azure server:
SqlConnection conn = new SqlConnection(csBuilder.ToString());
conn.Open();

Friday 10 February 2012

Tutorial to build an ASP.NET MVC Web application using Microsoft Visual Web Developer 2010

Heres a little tutorial on building your first MVC application in  Microsoft Visual Web 2010 

What You'll Build

You'll implement a simple movie-listing application that supports creating, editing, and listing movies from a database. Below are two screenshots of the application you’ll build. It includes a page that displays a list of movies from a database:
MoviesWithVariousSm
The application also lets you add, edit, and delete movies, as well as see details about individual ones. All data-entry scenarios include validation to ensure that the data stored in the database is correct.

Skills You'll Learn

Here's what you'll learn:
  • How to create a new ASP.NET MVC project.
  • How to create ASP.NET MVC controllers and views.
  • How to create a new database using the Entity Framework Code First paradigm.
  • How to retrieve and display data.
  • How to edit data and enable data validation.

Getting Started

Start by running Visual Web Developer 2010 Express ("Visual Web Developer" for short) and select New Project from the Start page.
Visual Web Developer is an IDE, or integrated development environment. Just like you use Microsoft Word to write documents, you'll use an IDE to create applications. In Visual Web Developer there's a toolbar along the top showing various options available to you. There's also a menu that provides another way to perform tasks in the IDE. (For example, instead of selecting New Project from the Start page, you can use the menu and select File > New Project.)

Creating Your First Application

You can create applications using either Visual Basic or Visual C# as the programming language. Select Visual C# on the left and then select ASP.NET MVC 3 Web Application. Name your project "MvcMovie" and then click OK. (If you prefer Visual Basic, switch to the Visual Basic version of this tutorial.)

In the New ASP.NET MVC 3 Project dialog box, select Internet Application. Check Use HTML5 markup and leave Razor as the default view engine.

Click OK. Visual Web Developer used a default template for the ASP.NET MVC project you just created, so you have a working application right now without doing anything! This is a simple "Hello World!" project, and it's a good place to start your application.

From the Debug menu, select Start Debugging.

Notice that the keyboard shortcut to start debugging is F5.
F5 causes Visual Web Developer to start a development web server and run your web application. Visual Web Developer then launches a browser and opens the application's home page. Notice that the address bar of the browser says localhost and not something like example.com. That's because localhost always points to your own local computer, which in this case is running the application you just built. When Visual Web Developer runs a web project, a random port is used for the web server. In the image below, the random port number is 43246. When you run the application, you'll probably see a different port number.

Right out of the box this default template gives you two pages to visit and a basic login page. The next step is to change how this application works and learn a little bit about ASP.NET MVC in the process. Close your browser and let's change some code.

Wednesday 8 February 2012

Increase the performance of a website

There are many ways to increase the performance of a website, but the way with the biggest impact by far is to decrease the number of HTTP requests.  Every time you reference an image, CSS file, JavaScript file, video, audio or a flash file, that adds an extra HTTP request.  That is time that could be used elsewhere, such as taking customer orders!
One way of reducing the number of HTTP requests is to combine the files.  If you have three style sheets sitting in your web page, that’s three separate HTTP requests.  Combining them into one file means there’s only one HTTP request.
You can take this one step further and add minification to this process.  Minification is the process of stripping out all of the white-space and comments from your CSS and JavaScript files.

If you’re familiar with ASP.NET, bundling and minification was always a job for your build process.  With the advent of Visual Studio 2011 and ASP.NET 4.5, Microsoft has added bundling and minification out of the box, which in my opinion has been long overdue.  This process happens at run-time and is available to ASP.NET WinForms, MVC and Web Pages.

Installation

Before starting any development, you’ll need to install ASP.NET 4.5.  The simplest way to do this is via the Web Platform Installer.  All of the ASP.NET 4.5 articles I’m authoring are developed in Visual Studio 2011 Developer Preview. Just type the below links in to Google.

Why Do This?

The answer is simple; to reduce the number of HTTP requests that go between the client and server.  The result is a faster website.  By default when you create a new MVC 4 website, the following JavaScript files are loaded into the page.
<script type="text/javascript" src="../../Scripts/jquery-1.6.2.min.js"></script>
<script type="text/javascript" src="../../Scripts/jquery-ui-1.8.11.js"></script>
<script type="text/javascript" src="../../Scripts/modernizr-2.0.6-development-only.js"></script>
<script type="text/javascript" src="../../Scripts/AjaxLogin.js"></script>
Looking at this through Chrome you can see the 4 separate HTTP requests.
We can do better that that! After you bundle it, you’ll see one request.

Where’s the Magic?

The magic happens at runtime in ASP.NET 4.5.  Instead of referencing each JavaScript file separately, you can replace them all with this:
<script src="scripts/js"></script>
And you can also bundle and minify your CSS files too by adding this line of code:
<link href="content/css" rel="stylesheet" />
This is assuming you have your JavaScript files in a folder called scripts, and your style sheets are in a folder called content.  This is configurable, of course – as you’ll soon see.
Before this will work, you need to add one line of code to the global.asax file in the Application Start event.
Bundle.Bundles.EnableDefaultBundles();
The need for this line of code will be removed when ASP.NET 4.5 is released.  When the website is running, if ASP.NET encounters either of these tags, it will automatically bundle and minify each file in the given folder and send back a single HTTP response for the JavaScript file and a single response for the CSS.  Out of the box you don’t need to do anything else.  This is a welcome feature.
By default, when the files are bundled by ASP.NET they are in alphabetical order.  If there are known libraries such as jQuery, jQuery UI and Dojo, they are loaded first.  For the CSS files, they are also bundled in alphabetical order.  The results can be seen in the image below.

Custom Rules
If the default bundling rules don’t give you the control that you need, you can always create your own bundling rules.  A common reason for doing this is to group common libraries.  There aren’t too many occasions when you need to bundle your entire JavaScript or CSS files into the one file.  To create a custom rule you create a new Bundle object.  Then you add files individually or an entire directory.
var jSBundle = new Bundle("~/CustomJs", typeof(JsMinify));
jSBundle.AddFile("~/Scripts/CustomFunction.js");
jSBundle.AddFile("~/Scripts/jquery-1.4.1-vsdoc.js");
jSBundle.AddFile("~/Scripts/jquery-1.4.1.js");
jSBundle.AddFile("~/Scripts/JSONCreate.js");
Notice the type JsMinify above?  That’s the default object that bundles and minifies the JavaScript files.  For CSS, you use CssMinify like the example below.
var cssBundle = new Bundle("~/CustomCss", typeof(CssMinify));
cssBundle.AddFile("~/Content/Collection.css");
cssBundle.AddFile("~/Content/GlobalSupport.css");
cssBundle.AddFile("~/Content/MasterStyle.css");
cssBundle.AddFile("~/Styles/MenuStyle.css");
To reference these custom rules, you put the name of each bundle in your HTML.
<script src="CustomJs"></script> or <link href="CustomCss" rel="stylesheet" />

Custom Processing

If you want total control, you can override the default CSS and JavaScript bundling support and replace it with a custom process.  An easy way to do this is to create a class that implements the IBundleTransform interface.  The following example is trivial but it demonstrates how to do this.  The example inserts a company copyright into each JavaScript files and sets the default cache for the file.
public class AddCopyrightToFiles : IBundleTransform
{
    public void Process(BundleResponse bundle)
    {
        StringBuilder sb = new StringBuilder();
        sb.AppendLine("// Copyright your company");
        sb.AppendLine(bundle.Content);
        bundle.Content = sb.ToString();
        bundle.Cacheability = HttpCacheability.ServerAndNoCache;
    }
}
And to use this custom process, create a new Bundle and reference the custom class.
BundleTable.Bundles.EnableDefaultBundles();
Bundle customBundle = new Bundle("~/CustomBundle", typeof(AddCopyrightToFiles));
customBundle.AddFile("~/Scripts/CustomTypes.js");
BundleTable.Bundles.Add(customBundle);
And in the HTML, just reference the bundle by its name.
<script src="CustomBundle"></script>

Friday 3 February 2012

The Majority Of Web Developers Are Moving To HTML5

A survey has found that 75 percent of developers are using, or plan to use HTML5 for app developement

A new survey from Evans Data has confirmed that developers continue to flock to HTML5.
Indeed, Evans Data’s latest Global Development Survey indicates that although the HTML5 standard is still a work in progress, software developers are already committed to it.

De Facto Standard

The survey of more than 1,200 developers conducted worldwide in November and December 2011 showed current use of HTML at 43 percent in North America; 39 percent in the Europe, Middle East and Africa (EMEA) region; and an even greater 58 percent in the Asia Pacific (APAC) region. Adding in those planning to use HTML5 brought the totals to over three-quarters across the regions.
“There isn’t any question about the adoption of HTML5 – it’s already the de facto standard” said Janel Garvin, CEO of Evans Data, in a statement. “There is special strength in HTML5 for mobile and cross-platform mobile apps, which is the direction the industry is moving for client devices, and that has made it extremely attractive to developers everywhere in the world. We see the most strength in Asia, a region that is generally quick to adopt new technologies.”
The survey also showed that developers are more likely to use a standalone HTML5 editor in APAC and EMEA, while North Americans prefer to use the editor in their integrated development environment (IDE). When asked about importance in the development cycle, HTML5 came in 20 percent higher on average across regions than either Flash or Silverlight.
HTML5 has caught on quickly with developers, and vendors are providing support for it in their core products. Microsoft has embraced HTML5 for its Internet Explorer browser and Windows 8 operating system.

Flash Dies

In November, Adobe announced plans to halt development of Flash for mobile browsers. In its explanation for the change in direction, Adobe cited the popularity of HTML5.

In a blog post by
 Danny Winokur, vice president and general manager of interactive development at Adobe, said, “However, HTML5 is now universally supported on major mobile devices, in some cases exclusively. This makes HTML5 the best solution for creating and deploying content in the browser across mobile platforms. We are excited about this, and will continue our work with key players in the HTML community, including Google, Apple, Microsoft and RIM, to drive HTML5 innovation they can use to advance their mobile browsers.”

The Evans Data Global Development Survey series is conducted worldwide twice a year. The current survey includes sections on Platform Use and Migration, Agile Development, Embedded Systems, Cloud Development, Mobile Development, Distribution Channels, Security, and Technology Adoption.

Upgrading an ASP.NET MVC 3 Project to ASP.NET MVC 4

ASP.NET MVC 4 can be installed side by side with ASP.NET MVC 3 on the same computer, which gives you flexibility in choosing when to upgrade an ASP.NET MVC 3 application to ASP.NET MVC 4.
The simplest way to upgrade is to create a new ASP.NET MVC 4 project and copy all the views, controllers, code, and content files from the existing MVC 3 project to the new project and then to update the assembly references in the new project to match the old project. If you have made changes to the Web.config file in the MVC 3 project, you must also merge those changes into the Web.config file in the MVC 4 project.
To manually upgrade an existing ASP.NET MVC 3 application to version 4, do the following:
  1. In all Web.config files in the project (there is one in the root of the project, one in the Views folder, and one in the Views folder for each area in your project), replace every instance of the following text:
  2.   
    System.Web.Mvc, Version=3.0.0.0 
    System.Web.WebPages, Version=1.0.0.0 
    System.Web.Helpers, Version=1.0.0.0 
    System.Web.WebPages.Razor, Version=1.0.0.0
    with the following corresponding text:
      
    System.Web.Mvc, Version=4.0.0.0 
    System.Web.WebPages, Version=2.0.0.0 
    System.Web.Helpers, Version=2.0.0.0, 
     System.Web.WebPages.Razor, Version=2.0.0.0,
  3. In the root Web.config file, update the webPages:Version element to "2.0.0.0" and add a new PreserveLoginUrl key that has the value "true":
  4. <appSettings> 
      <add key="webpages:Version" value="2.0.0.0" /> 
      <add key="PreserveLoginUrl" value="true" /> 
    <appSettings>
  5. In Solution Explorer, delete the reference to System.Web.Mvc (which points to the version 3 DLL). Then add a reference to System.Web.Mvc (v4.0.0.0). In particular, make the following changes to update the assembly references. Here are the details:
    1. In Solution Explorer, delete the references to the following assemblies:
      • System.Web.Mvc (v3.0.0.0)
      • System.Web.WebPages (v1.0.0.0)
      • System.Web.Razor (v1.0.0.0)
      • System.Web.WebPages.Deployment (v1.0.0.0)
      • System.Web.WebPages.Razor (v1.0.0.0)
    2. Add a references to the following assemblies:
      • System.Web.Mvc (v4.0.0.0)
      • System.Web.WebPages (v2.0.0.0)
      • System.Web.Razor (v2.0.0.0)
      • System.Web.WebPages.Deployment (v2.0.0.0)
      • System.Web.WebPages.Razor (v2.0.0.0)
  6. In Solution Explorer, right-click the project name and then select Unload Project. Then right-click the name again and select Edit ProjectName.csproj.
  7. Locate the ProjectTypeGuids element and replace {E53F8FEA-EAE0-44A6-8774-FFD645390401} with {E3E379DF-F4C6-4180-9B81-6769533ABE47}.
  8. Save the changes, close the project (.csproj) file you were editing, right-click the project, and then select Reload Project.
  9. If the project references any third-party libraries that are compiled using previous versions of ASP.NET MVC, open the root Web.config file and add the following three bindingRedirect elements under the configuration section:
    <configuration> 
      <!--... elements deleted for clarity ...--> 
      
      <runtime> 
        <assemblyBinding xmlns="urn:schemas-microsoft-com:asm.v1"> 
          <dependentAssembly> 
            <assemblyIdentity name="System.Web.Helpers"  
                 publicKeyToken="31bf3856ad364e35" /> 
            <bindingRedirect oldVersion="1.0.0.0" newVersion="2.0.0.0"/> 
          </dependentAssembly> 
          <dependentAssembly> 
            <assemblyIdentity name="System.Web.Mvc"  
                 publicKeyToken="31bf3856ad364e35" /> 
            <bindingRedirect oldVersion="1.0.0.0-3.0.0.0" newVersion="4.0.0.0"/> 
          </dependentAssembly> 
          <dependentAssembly> 
            <assemblyIdentity name="System.Web.WebPages"  
                 publicKeyToken="31bf3856ad364e35" /> 
            <bindingRedirect oldVersion="1.0.0.0" newVersion="2.0.0.0"/> 
          </dependentAssembly> 
        </assemblyBinding> 
      </runtime> 
    </configuration>

Enhancements to Default Project Templates in MVC4

Enhancements to Default Project Templates

The template that is used to create new ASP.NET MVC 4 projects has been updated to create a more modern-looking website:

In addition to cosmetic improvements, there’s improved functionality in the new template. The template employs a technique called adaptive rendering to look good in both desktop browsers and mobile browsers without any customization.

To see adaptive rendering in action, you can use a mobile emulator or just try resizing the desktop browser window to be smaller. When the browser window gets small enough, the layout of the page will change.
Another enhancement to the default project template is the use of JavaScript to provide a richer UI. The Login and Register links that are used in the template are examples of how to use the jQuery UI Dialog to present a rich login screen: